
Ever stared at a tangle of wires on your new sprinkler valves and felt lost? You’re not alone. Many homeowners face this hurdle when setting up an automated irrigation system. But fear not—this guide walks you through wiring sprinkler system valves with ease. You’ll connect everything to your irrigation controller, often called a timer, and get your lawn watered just right.
Think of your sprinkler setup like a team’s communication network. The controller sends signals to open valves in specific zones, like front yard or backyard. Proper wiring keeps water flowing where you want it, saving time and resources. In the U.S., faulty irrigation setups waste about 30% more water than needed, according to landscaping experts. By following these steps, you’ll avoid that pitfall and enjoy a reliable system that thrives in any season.
This post covers the basics of sprinkler valve wiring, from parts to connections and tips. Whether you’re fixing an old setup or building from scratch, you’ll gain confidence. Let’s dive in and make your irrigation project a success.
Understanding Sprinkler Valve Components and Wiring Basics
The Anatomy of a Sprinkler Valve
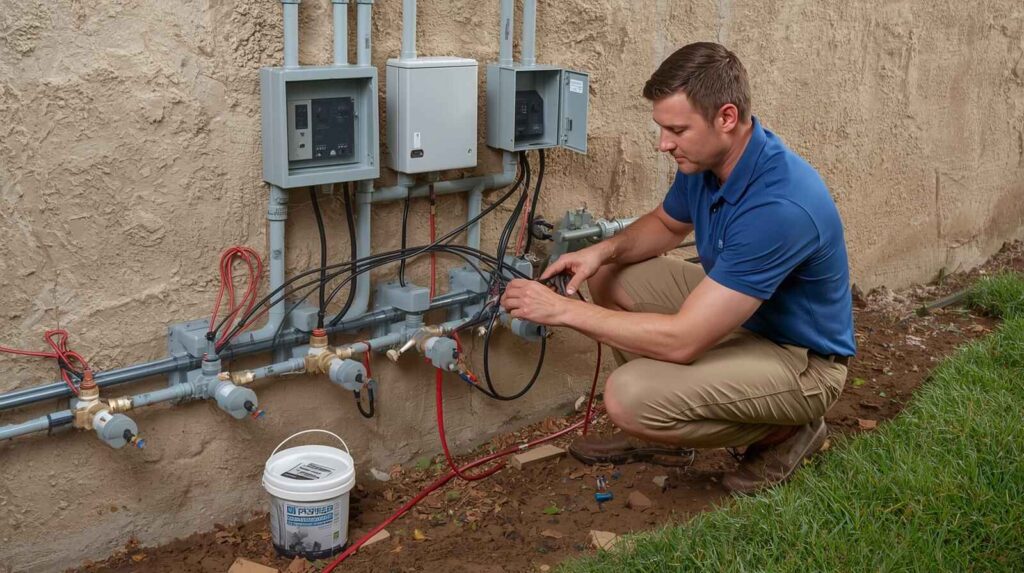
Sprinkler valves control water flow to different areas of your yard. Each one has key parts that make wiring simple once you know them. The solenoid sits at the heart—it’s an electromagnet that pulls or pushes to start or stop water.
When the controller sends a signal, the solenoid activates. This moves the actuator, a small mechanism that opens or closes the valve. Wires attach to the solenoid, carrying that electrical pulse from the controller. You might see two wires coming off each solenoid. They look plain, but they’re vital for the whole system to work. Understanding these pieces helps you avoid mix-ups during setup.
Essential Wiring Concepts
Wiring sprinkler valves starts with a few core ideas. The common wire acts as a shared path back to the controller. It links all valves together, completing the electrical circuit so signals can reach each one. Without it, your zones won’t respond. Zone wires, usually in colors like red or green, handle specific areas. Each color ties to a numbered spot on the timer, like zone one or two. Colors guide you, but they’re flexible. You can swap them at the controller if needed. This setup lets you customize zones for different plants or grass types in your yard.
The Wiring Process: Connecting Your Valves
Preparing the Valves for Connection
Before you touch any wires, get your valves ready. Lay them out in a clear spot, away from dirt or water. Check each one for damage—no frayed ends or loose parts. Remove the protective covers from the solenoid wires. These caps shield the connections during shipping. Peel them off gently to expose the bare wire tips. Each valve has just two wires from its solenoid. One will join the common group. The other goes to a zone color. Take a moment to label them if you like, though it’s optional.
Connecting to the Common Wire
This step ties all valves into one network. Pick one wire from each solenoid—doesn’t matter which. Twist them together tightly by hand. Use a wire nut to secure the bundle. Turn it clockwise until snug. This keeps moisture out and holds the connection firm. The common wire, often white, links this group to the controller. It runs from your valves back to the timer’s common terminal. All zones share this path, so make it solid—no loose strands.
Connecting to Zone-Specific Wires
Now handle the second wire from each valve. Connect one to a red wire for zone one, say. Another to green for zone two, and so on. Twist each pair and cap with a wire nut. Colors match the zones on your controller. For three valves, you might use red, green, and blue. If colors don’t match your plan, no worry. You can switch them later at the timer by pulling plugs. Jot down which valve links to which color for reference.
Connecting to the Irrigation Controller
Understanding Controller Terminals
Your irrigation controller is the system’s boss. It has terminals labeled for easy setup. The common spot, marked “C” or “Com,” takes the white wire bundle. Zone terminals are numbered, like 1, 2, 3. Each matches a colored wire from your valves. Power comes in through its own plug, usually 24 volts for safety. Locate these spots before wiring. Some controllers have push-in connectors. Others use screws—check your model’s manual for details.
Finalizing the Connections
Run the common bundle to the controller’s C terminal. Strip a bit of insulation if needed, then insert or screw it in place. Tug gently to test the hold. For zones, plug the red wire into terminal 1. Green to 2, and so forth. Match colors to numbers as you planned. If a zone feels off, unplug and swap at the controller. It’s quick—no need to rewire valves. Power on the timer and run a test cycle to check flow.
Troubleshooting and Best Practices
Common Wiring Issues and Solutions
Problems pop up sometimes, but fixes are straightforward. If one zone stays dry, inspect its zone wire connection first. Then check the common link and timer’s settings. When all zones fail, look at the main common wire. It might have come loose or corroded. Also verify the controller’s power dead outlet means no signals. Spotty operation? Hunt for loose nuts or water damage. Tighten everything and dry out wet spots. A multimeter can test continuity if you’re handy with tools.
Tips for a Durable and Reliable Installation
Make your setup last with smart choices. Grab waterproof wire nuts for every splice. They seal against rain and dirt, cutting corrosion risk by half. Bundle wires neatly with zip ties. Run them through PVC conduit if mowers might hit them. This protects from cuts and wear. Label each end—use tape with “Zone 1” or “Common.” It speeds up fixes later. Bury wires 6-12 inches deep for extra safety in active yards.
Conclusion
Key Takeaways for Successful Valve Wiring
Wiring sprinkler system valves boils down to two main links: the common wire for all, and colored ones for zones. The common ties everything back to the controller, ensuring signals reach every valve. Zone colors guide assignments, but you can tweak them easily at the timer.
Once you grasp the solenoid’s role and basic connections, the process feels simple. No need for fancy tools, just wire nuts and care. This setup powers efficient watering, keeping your lawn green without waste.
Next Steps for Your Irrigation System
Test each zone right after wiring. Turn on the controller and watch water spray where it should. Adjust timers for your local rain patterns short runs in summer, longer in dry spells. For ongoing care, check connections yearly. Clean valves of debris to keep flow strong. If you add zones later, repeat these steps to expand smoothly. Ready to green up your yard? Grab your tools and start wiring. Your sprinkler system will thank you with a lush, healthy landscape.